
Are you wondering how to set your LiftMaster garage door opener properly? Setting up this essential piece of equipment doesn’t have to be overwhelming. LiftMaster is a trusted brand known for reliable, high-quality new garage door openers. But to get the most out of its features and security capabilities, setting it up correctly is crucial.

Properly setting up a LiftMaster garage door opener not only enhances security by preventing unauthorized access but also ensures smoother operation over time. Many homeowners overlook the setup, leading to potential issues and higher maintenance costs later. This guide will help you avoid those pitfalls, ensuring a setup that’s quick, straightforward, and effective.
Throughout this guide, we’ll walk you through each step with clear instructions. From preparing your tools to programming the remote and setting the door’s limits, this comprehensive guide covers everything you need to know. Read on to confidently set up your LiftMaster and enjoy peace of mind and optimal performance!
Why Proper Setup of LiftMaster Garage Door Opener Matters
Setting up your LiftMaster garage door opener correctly offers many benefits:
- Enhanced Security: A well-set opener limits access, adding security for your family and belongings.
- Extended Lifespan: Avoiding improper setup can reduce strain on your new garage door components, allowing them to last longer.
- Fewer Maintenance Issues: Properly configured openers work efficiently, minimizing the likelihood of breakdowns.
A thorough setup allows you to maximize these benefits, so let’s dive into the tools and preparations needed to get started.
Pre-Setup Preparations

Before starting, gather the necessary tools and check your model to ensure everything goes smoothly. Here’s what you’ll need:
- Tools Required: Screwdriver, ladder, measuring tape, and the user manual for your LiftMaster model.
- Check Model Specifications: Different models may have unique requirements or additional features to consider, so review the manual.
- Safety First: Confirm the area is clear, and follow any safety instructions provided in the manual to avoid injury or damage.
With these in place, you’re ready to begin setting up your LiftMaster garage door opener!
Step-by-Step Guide to Setting Up Your LiftMaster Garage Door Opener
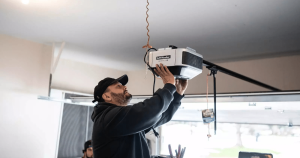
Step 1: Powering the Opener and Initial Setup
- Plug in the opener and ensure it has power.
- Locate the control panel to start the programming process.
- Follow any model-specific prompts on the control panel screen to begin setup.
Step 2: Programming the Remote Controls
Syncing your remote control is a simple but essential step:
- Press the “Learn” button on the garage door opener.
- Within 30 seconds, press the button on your remote that you wish to program.
- Wait for the opener lights to flash, indicating a successful connection.
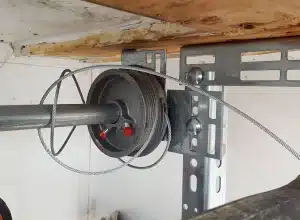
Step 3: Setting the Door Travel Limits
Setting travel limits ensures your door opens and closes correctly:
- Open Travel: Press and hold the UP button until the door reaches the open position you want, then release.
- Close Travel: Repeat with the DOWN button to set the lower limit.
- Test Limits by opening and closing the door fully, making any adjustments as needed.
Step 4: Testing the Safety Reversal System

Safety is a priority, and this step ensures the door reverses if it encounters an obstruction:
- Place an object in the door’s path and close the door. The door should reverse upon touching the object.
- Adjust if needed by consulting your manual for settings.
Step 5: Configuring Additional Features
Many LiftMaster openers offer smart features:
- WiFi Setup: Use the LiftMaster app to connect your opener to your WiFi network.
- MyQ Compatibility: Enable MyQ for remote access and control from your smartphone.
Troubleshooting Common Setup Issues
Here are solutions for common problems that may arise:
- Remote Not Syncing: Check the battery or try re-programming using the instructions in Step 2.
- Travel Limits Not Setting Correctly: Adjust the up and down limits carefully until the door opens and closes properly.
- Safety Reversal Not Working: Recalibrate the system and ensure there are no obstructions near the sensors.
If you encounter issues beyond these, consider reaching out to LiftMaster customer support for guidance.
Maintenance Tips for a Well-Functioning LiftMaster Opener
To keep your LiftMaster opener working smoothly, routine maintenance is essential. Here are a few tips:
- Regular Inspections: Check the door’s movement and the opener’s response to remote commands.
- Safety Tests: Conduct regular safety reversal tests to ensure ongoing functionality.
- Lubricate Moving Parts: Lubricating the chain, rollers, and hinges will reduce wear and keep the door quiet.
These simple steps will help you avoid breakdowns and prolong the life of your garage door opener.
FAQs
How do you program a LiftMaster garage door opener?
To program a LiftMaster garage door opener, locate the “Learn” button on the motor unit, typically found on the back panel. Press and release the button, then within 30 seconds, press and hold the button on the remote control you want to program until the garage door opener light blinks, indicating successful programming.
How do I set the time on my LiftMaster garage door opener?
If your LiftMaster opener includes a wall control panel with a digital display, press the “Settings” button and navigate to the time display option. Use the arrow buttons to adjust the hour and minute, then press “Enter” or “OK” to save the time setting.
How do I reset my garage door opener?
To reset your LiftMaster garage door opener, press and hold the “Learn” button on the opener until the indicator light turns off, which takes about six seconds. This will erase all programmed remotes and keypad codes, allowing you to reprogram devices from scratch.
How to reset a LiftMaster garage door opener remote?
To reset a LiftMaster garage door opener remote, press and hold the “Learn” button on the motor unit for about six seconds to clear all remote connections. Then, reprogram the remote by pressing the “Learn” button again and pressing the button on your remote within 30 seconds to re-establish the connection.
How do I set up my LiftMaster remote?
To set up your LiftMaster remote, press the “Learn” button on the garage door opener, then press and hold the desired button on your remote control within 30 seconds. Once the opener light blinks, your remote is successfully programmed and ready for use.
How do you control a LiftMaster garage door opener?
You can control a LiftMaster garage door opener using the remote control, the wall control panel, or through a smartphone app if it’s equipped with MyQ technology. The remote and wall control operate the opener within close range, while MyQ lets you control and monitor your door from anywhere.
Conclusion
Setting up your LiftMaster garage door opener is the first step toward secure, efficient garage door operation, but it doesn’t end there! At JT’s Overhead Doors, we understand that every detail of your garage door system contributes to your home’s safety and convenience. Our team is here to provide the expertise you need, whether it’s installing, maintaining, or troubleshooting your LiftMaster opener. We specialize in ensuring that every part of your system is set up for maximum performance so you can have peace of mind knowing your garage door will work seamlessly every time.
If you’re still uncertain about any part of the setup process, or if issues arise, don’t hesitate to reach out. As professionals in garage door solutions, we’ve handled countless LiftMaster models and know the best practices for achieving a flawless setup. Rather than navigating the setup alone, let our technicians provide hands-on support, saving you time and ensuring everything operates correctly from day one. Plus, our team is always up-to-date with the latest LiftMaster technology, so you’re guaranteed the best service.
Ready to get the most out of your LiftMaster opener? Give JT’s Overhead Doors a call! Whether you’re looking to install a new opener, fine-tune the settings on your existing one, or schedule regular maintenance, we’re here to help. Experience the difference with a professional touch – let us handle your garage door needs so you can enjoy reliability and security for years to come.
End Note
Thank you for choosing JT’s Overhead Doors for all things garage doors! Our team is dedicated to providing you with top-notch service, resources, and expertise to keep your garage door running smoothly. To learn more about our services and the latest industry insights, check out our main website at JT’s Overhead Doors. Here, you can discover more about our commitment to quality and explore what sets us apart—visit our About Us page to meet our team and understand our values.
For even more valuable information, don’t miss our Blog, packed with helpful articles and tips to guide you through garage door maintenance and upgrades. If you’re ready to enhance your home’s curb appeal, explore custom options with our Door Designer Tool to visualize the perfect door for your space. We also provide specialized services in Scottsdale and are always ready to assist with installation, repair, and maintenance to keep your door performing at its best.
Want to save on your next service? Don’t forget to check out our latest offers on the Coupons page and explore our complete list of Garage Door Services. For all things LiftMaster, including installation, programming, and troubleshooting, take a look at our dedicated LiftMaster page for expert guidance tailored to this trusted brand. And if you have any questions or are ready to book a service, reach out through our Contact page to speak directly with our friendly team.
Stay connected with us on social media for the latest updates and behind-the-scenes insights into our work! Follow us on Instagram and Facebook to join our community and stay inspired by our recent projects. We’re here to help, so feel free to reach out, learn more, and let us be your trusted partner for all garage door needs.