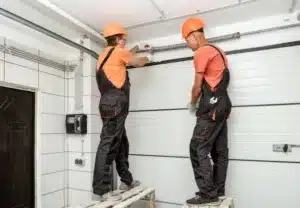

Garage door springs play a crucial role in the smooth operation of your garage door. Over time, these springs can wear out and break, causing inconvenience and potential safety hazards. While hiring a professional for garage door spring replacement is always an option, many homeowners prefer taking matters into their own hands. In this comprehensive guide, we will walk you through the process of mastering DIY garage door spring replacement. From understanding the importance of spring replacement to learning the step-by-step process, we’ve got you covered.
Understanding the Importance of Garage Door Spring Replacement
Before diving into the process of replacing garage door springs, it’s essential to understand why it is necessary. The springs in your garage door system are responsible for counterbalancing the weight of the door, making it easier to open and close. Over time, these springs can become worn out or break, causing the door to become heavy and difficult to operate. Ignoring this issue can lead to further damage to your garage door opener or other components of the system. Therefore, regular spring replacement is crucial for maintaining the functionality and longevity of your garage door.
Signs that Indicate It’s Time to Replace Your Garage Door Springs
Knowing when to replace your garage door springs is essential for preventing unexpected failures and ensuring the safety of your family and property. There are several signs that indicate it’s time to replace your springs. First and foremost, if you notice your garage door becoming heavy and difficult to open manually, it’s a clear indication that the springs are wearing out. Additionally, if you hear loud noises or squeaking sounds when operating the door, it could be a sign of worn-out springs. Visual inspection can also help identify potential issues, such as rust or gaps in the springs, indicating the need for garage door repair. If you notice any of these signs, it’s time to consider replacing your garage door springs.
Types of Garage Door Springs and Their Functions
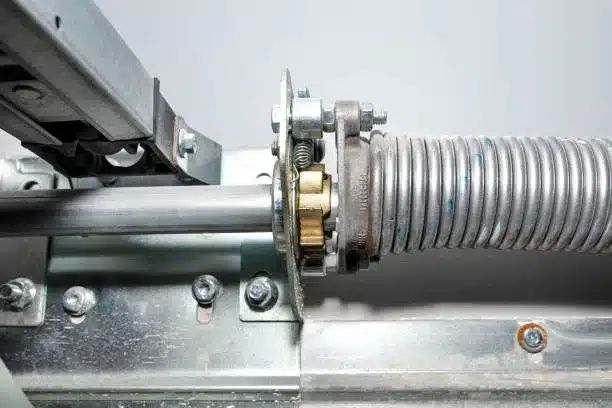
Before you start the replacement process, it’s important to understand the different types of garage door springs and their functions. The two most common types are torsion springs and extension springs. Torsion springs are typically mounted above the garage door and use torque to counterbalance the weight. On the other hand, extension springs are usually installed on either side of the door and expand and contract to support the door’s weight. Understanding the type of springs your garage door uses will help you select the appropriate replacement parts and follow the correct procedure for replacement.
Tools and Equipment Needed for DIY Garage Door Spring Replacement
To successfully replace garage door springs, you’ll need to gather the necessary tools and equipment beforehand. Here is a list of essential items:
- Safety goggles and gloves – Protect your eyes and hands from potential injuries.
- Adjustable wrench – Used to loosen and tighten nuts and bolts.
- Vise grips – Helpful for holding and securing various parts.
- Socket set – Used to remove and install bolts and nuts.
- C-clamps – Used to secure the door in place during the replacement process.
- Stepladder – Provides access to the springs and other components.
- Replacement springs – Make sure to purchase the correct type and size of springs for your door.
Having these tools readily available will ensure a smooth and efficient DIY garage door spring replacement process.
Step-by-Step Guide to Replacing Garage Door Springs
Now that you have a good understanding of the importance of spring replacement and the necessary tools, let’s dive into the step-by-step guide for replacing garage door springs.
Step 1: Safety First
Begin by disconnecting the power to the garage door opener to prevent any accidental activation during the replacement process. Also, ensure that the door is fully closed and secure it in place using C-clamps.
Step 2: Identify the Type of Springs
Inspect your garage door system to determine whether it uses torsion springs or extension springs. This information is crucial for selecting the appropriate replacement parts and following the correct procedure.
Step 3: Release Tension
If your garage door has torsion springs, you’ll need to release the tension before removing them. This can be done by using winding bars inserted into the winding cones. It’s important to follow the manufacturer’s instructions or seek professional guidance to ensure your safety, especially when it comes to garage door repair.
Step 4: Remove Old Springs
Once the tension is released, you can proceed to remove the old springs. Use the appropriate tools, such as an adjustable wrench or socket set, to loosen and remove the bolts securing the springs in place.
Step 5: Install New Springs
Carefully install the new springs, following the manufacturer’s instructions. Make sure to use the correct size and type of springs for your specific garage door.
Step 6: Reattach Cables and Adjust Tension
After installing the new springs, reattach the lifting cables to the bottom brackets. Gradually increase the tension on the springs by using the winding bars. Be cautious and follow the manufacturer’s instructions to avoid accidents.
Step 7: Test the Door
Once the springs are properly installed and tension is adjusted, test the functionality of your garage door. Open and close it a few times to ensure smooth operation.
By following this step-by-step guide, you can confidently replace your garage door springs and restore the functionality of your garage door.
Common Mistakes to Avoid During DIY Garage Door Spring Replacement
While DIY garage door spring replacement can save you money, it’s crucial to avoid common mistakes that can lead to accidents or further damage. Here are a few mistakes to avoid:
- Ignoring safety precautions – Always wear safety goggles and gloves and follow all safety guidelines to prevent injuries.
- Using incorrect springs – Ensure that you purchase the correct type and size of springs for your specific garage door.
- Releasing tension improperly – Improperly releasing tension from torsion springs can cause them to snap back violently, leading to severe injuries.
- Over-tightening or under-tightening springs – Incorrect tension can result in a malfunctioning garage door and potential safety hazards, necessitating professional garage door repair.
- Rushing the process – Take your time and follow the step-by-step guide carefully to ensure a successful replacement.
By being aware of these common mistakes and taking the necessary precautions, you can avoid potential accidents and ensure a smooth DIY garage door spring replacement process.
Safety Precautions for DIY Garage Door Spring Replacement
When it comes to DIY garage door spring replacement, safety should be your top priority. Here are some essential safety precautions to follow:
- Always wear safety goggles and gloves to protect your eyes and hands from potential injuries.
- Disconnect the power to the garage door opener before starting the replacement process to prevent accidental activation.
- Secure the door in place using C-clamps to prevent it from unexpectedly falling during the replacement.
- Follow the manufacturer’s instructions and guidelines for releasing tension and adjusting springs to avoid accidents.
- If you’re unsure about any step of the process, consult a professional or seek expert advice to ensure your safety.
By following these safety precautions, you can minimize the risk of accidents and ensure a safe DIY garage door spring replacement experience.
Benefits of DIY Garage Door Spring Replacement
While hiring a professional for garage door spring replacement is always an option, there are several benefits to taking on the task yourself.
- Cost savings – DIY spring replacement eliminates the labor cost associated with hiring a professional.
- Flexibility – You can choose a time that is convenient for you to complete the replacement, rather than relying on someone else’s schedule.
- Empowerment – Mastering the skill of DIY garage door spring replacement gives you a sense of accomplishment and control over your home maintenance.
- Timely repairs – When you can replace the springs yourself, you can address the issue promptly without waiting for a professional to become available.
By taking on the task of DIY garage door spring replacement, you can enjoy these benefits and take control of your garage door maintenance.
When to Hire a Professional for Garage Door Spring Replacement
While DIY garage door spring replacement can be rewarding, there are certain situations where it’s best to hire a professional. Consider the following scenarios:
- Lack of experience – If you don’t have any prior experience with garage door maintenance or repairs, it’s safer to hire a professional for garage door repair.
- Complex spring systems – Some garage doors have complex spring systems that may require specialized knowledge and equipment for replacement.
- Safety concerns – If you have any doubts about your ability to safely perform the replacement, it’s best to leave it to the professionals.
- Limited time or physical limitations – If you have a busy schedule or physical limitations that prevent you from dedicating enough time and effort to the replacement process, hiring a professional is a wise choice.
Remember, the safety of yourself and your family should be the top priority. If you’re unsure about your capabilities or face any challenges during the process, it’s always best to seek professional assistance.
Conclusion: Taking Control of Your Garage Door Maintenance and Safety
Mastering the skill of DIY garage door spring replacement is a valuable asset for homeowners. By understanding the importance of spring replacement, recognizing the signs of wear, and following the step-by-step guide, you can confidently tackle this task. However, it’s crucial to prioritize safety and avoid common mistakes.
If you’re unsure about your abilities or face any challenges, don’t hesitate to seek professional garage door repair in Mesa, AZ. By taking control of your garage door maintenance, you’ll ensure the safety and functionality of your garage door for years to come.
Contact JT’s Overhead Door for expert assistance and professional garage door services.